
When it comes to center fired rifles accuracy is often one of the first things that shooters talk about. Which rifle brand or caliber is the most accurate and how far it can reach out and hit the target. Although precision shooting often has a lot to do with the person holding the rifle at the time that it is fired.
There are few things that can be done to a wooden stocked, bolt action rifle that can improve repeatable accuracy more than properly bedding and pillaring the rifle’s action. The goal is to have a free-floating barrel (that does not touch the stock) and to have the rifle’s action sitting in a solid, secure bed in the stock that is not affected by heat, humidity, or the cold.
The term bedding is used to describe the marriage between the stock and the rifles action. The action must have a solid platform to sit on and wood, although beautiful to look at, is a is poor median to do this. Don’t get me wrong, I love a finely finished stock made from walnut or maple as much as anyone, but wood, because of its properties and porous nature is prone to expansion, contraction, and humidity changes. Now I am not saying to go out and replace your wooden stock with a synthetic or plastic stock. Fiberglass, plastic, and other types of synthetic stocks have their own set of issues. All I’m recommending is having the wooden rifle stock bedded.
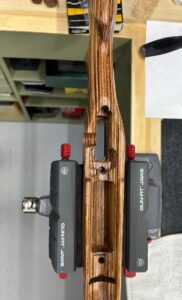
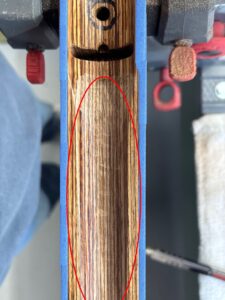
Proper bedding, like many things, starts with a good foundation and a plan. The first step is to assess the current condition of the stock and how the barrel fits in relation to it. I personally use two thick stock 3 x 5 cards, but I have seen people use dollar bills, playing cards etc.. You want to slide those cards under the barrel (between the barrel and stock) and slide them all the way up to the action. If there is any resistance along the way or they do not fit, you have an issue with barrel clearance. If the cards get stuck in only one or two places mark those areas on some masking tape so they can be addressed later. The goal here is to have a free-floating barrel that does not come into contact with the stock.
The next step is to remove the action from the stock. Were the action screws tight? Was there marring on the screw heads that would indicate someone else has tighten or removed them before. Once the action screws have been removed and the barrel/action has been removed from the stock it is time to assess the condition of the stock. Are there cracks in the stock? If so, now is the time to fix those issues. Is the bedding area of the stock raw untreated wood? Are there any rust spots on the barrel or action? Are there dark areas that are saturated with gun oil? All of these things should be addressed before the bedding and pillaring process can begin.
With the action removed, sand the areas of the stock that you marked with masking tape (where the barrel came in contact with the stock). Refit the action and barrel, tighten the action screws and check for clearance. You will repeat this process many times as you slowly sand off the right amount of wood, in the same concaved shape as the stock was when you started.
When bedding the stock, I only use the highest quality materials. Steel sleeves for the action bolts (not aluminum or other type of metal). The action is made of steel and so are the action bolts and I do not like to use dissimilar metals in contact with each other. It is not an electrolysis concern in this instance but different metals contract and expand at different rates. Aluminum’s thermal expansion coefficient is about three times higher than steel. This means that aluminum has a greater volumetric expansion upon heating, and a greater contraction upon cooling.
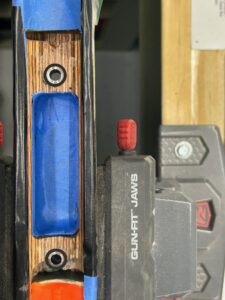
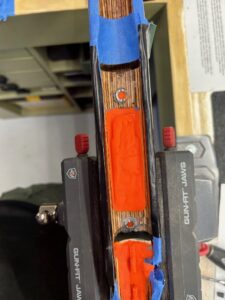
Once the action and barrel have been removed take the time to tape off the rifle to protect it. You need to tape off any areas that you do not want scratched or covered in epoxy.
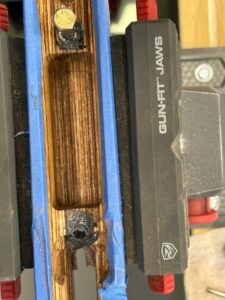
Once the bedding pillars are cut to length (the exact length of the space between the rifle’s receiver and the top of the action screw once torqued to the proper specifications), the action holes are made wider with a drill. Normally I will try to make the hole between 1/8th and 1/16th inch larger in diameter. This allows clearance for the epoxy, which will surround the steel tube and lock it into place.
I usually complete the pillaring process before I start making changes in the gun stock for bedding clearance. After 24 hours have passed, for the epoxy to cure, you can check for clearance of the action within the stock. In most cases some wood for the interior of the stock will have to be removed. Once I have obtained the clearance for the bedding epoxy, which often requires a Dremel tool and a very sharp small wood chisel, we are ready for the next step.
Applying clay and release agent. Every exposed hole in the receiver and areas in the stock, that you don’t want epoxy in must the filled. I use Playdoh because it is easy to remove, but some people use modeling clay. Once that is done, release agent is applied to the metal receiver everywhere epoxy might flow. PVA (Poly Vinyl Alcohol), neutral shoe polish, Johnson’s Paste Wax are just some of the examples of release agent. Wipe off the first coat and apply another. Repeat this process with a third coat and once it is dry it wipe off. Spray or brush on PVA is not wiped off.
As a bedding epoxy I have used Acraglas for years. It will cure harder than most epoxies and you can dye it the color to match your stock in most cases. Mix the epoxy completely, then mix it some more. I apply a generous amount to all of the areas that the action will com into contact with the stock and the action bolts (top of the previously installed pillars). I have found that the best thing you can do is avoid the areas around the trigger and magazine well (if the rifle has one). It is very important to include the area where the receiver (action) meets the barrel and the barrel lug. This area has to have a tight, glove like fit.
Place the 3”x 5” card spacers between the barrel and stock. Torque the action screws and then wrap the receiver and barrel with surgical tube to ensure even clamping pressure. Wipe off any Acraglas that squeezed out of the rifle. Let the Acraglas cure for at least 24 hours. Remove the action screws and surgical tubing and, with a sharp hit (using the palm of your hand on the barrel) remove the receiver/barrel from the stock.
The final step is to clean up any excess Acraglas.
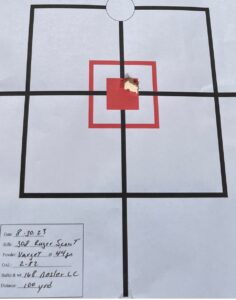
The rifle should have a very noticeable difference in accuracy. This target is from one of my customer’s shooting five shots from a .308 win Ruger rifle, at 100 yards, after I pillar and bedded the rifle.
Recent Comments